
 To decorate our front entry, I found a website that described how to make these 3D Stars, but it was very confusing – so I thought I would share my star-making journey with – hopefully – some easier instructions. They make great decorations, and might be a fun craft to do with children who are a little bit older.
Step One: Cut the longest piece of paper you can find into approximately one-inch strips – then tape 3 or 4 pieces together to make them even longer. OR, you could buy paper strips from a craft store to make the task a little easier.


Step Two: Fold the strips in half and line up the ends. Cut the ends so that it makes the paper easier to work with.


Step Three: Line up the ends so that they’re a little off – one half is about 3 inches longer than the other. Crease the fold so that you don’t loose this ratio.

Step Four: Create a basket weave bottom by sliding the two loose ends of each strip into the folded end of another strip.

Step Five: The last strip of the basket weave will have to be pushed through an existing weave like a stitch.

Step Six: Fold the top-right strip behind and to the right to form a triangle.

Step Seven: Now fold that same piece forward and down to form a pyramid.

Step Eight: Now fold this strip forward and to the left to get back to a pyramid. You will have to feed this strip through the top of your basket weave. If you pick it up and bend the triangle backwards a little bit when you do it it makes it a little easier to feed it through.
 Step Nine: Repeat this step for the remaining 3 strips coming out on the right side of the star – then flip the project over and do the same thing 4 more times on the back. Then fold the left over strip straight up in the air from where it comes out of the weave.

Step Ten: This is where I had to add another strip of paper to keep going. Set your star on it’s side so that it is standing up. Take the strip on the right (the one that I added paper to in this photo). Hold the tip of this strip with your thumb on top and index finger on the bottom and rotate the strip counter-clockwise. Keep the top part with your thumb on top always.

Step Eleven: Slide that underneath the strip to the left (make sure to keep the original top still facing up)
 Step Twelve: Pull the loop tight to make a point (I tucked the ends of my strips into the triangle point so that the 3d point would stay tight, but if it’s easier you can just cut your ends off).

Step Thirteen: Repeat on the remaining 3 strips sticking out on this side. Turn the star over and repeat on all 4 strips on that side.
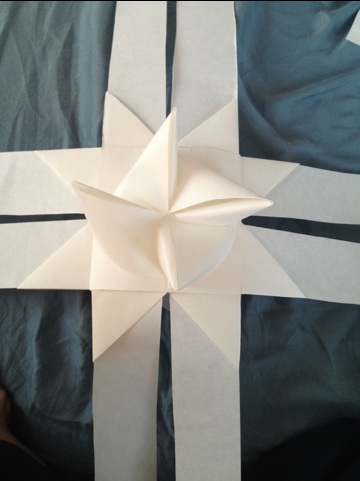 You’re all finished! One tip is that if the tape from where you joined the paper together is showing on a particular fold, undo that last step and move the tape back some so that it is hidden.
Merry Christmas!
